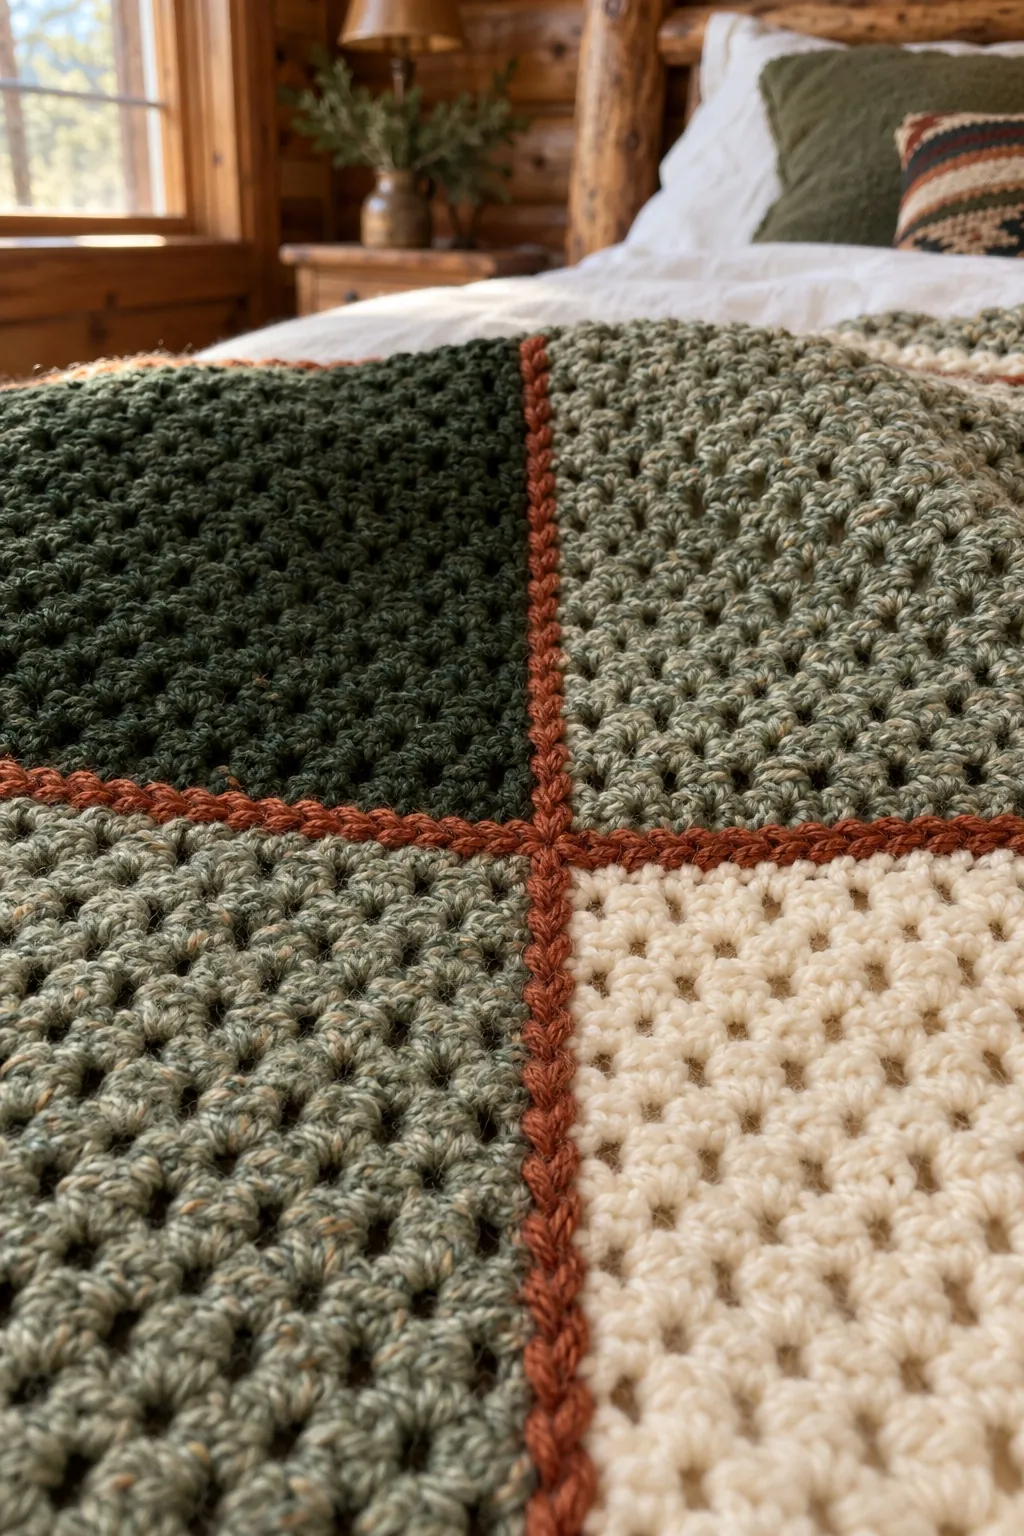
Picture a log cabin in the Vermont woods in late October, a flannel shirt hanging by the door, and a blanket on the bed in the same colors. That’s the idea behind this crochet plaid blanket: deep forest green, a soft heathered sage and bright cream checks, crossed by thin rust lines like the overcheck on a well-worn flannel.
It looks woven, but it’s really 56 small squares, each one a single color, worked in moss stitch with nothing harder than chains and single crochet. The rust lines are the seams: joining the squares with slip stitches on the front draws the plaid. I love a project that fits in a tote bag, and one square fits nicely into a long coffee break.
Is this crochet plaid blanket the right step after your first blanket?
Yes, if one blanket is already behind you and you’re happy to repeat a small square many times. Nothing here is harder than single crochet. What’s new is keeping 56 squares the same size and joining them in the right order. You’ll use three stitches. Each square starts with chains, the moss stitch and the border are all single crochet, and the seams are slip stitches: insert the hook, yarn over, and pull the loop straight through the fabric and the loop on your hook, without adding any height.
Moss stitch isn’t in the Stitch Library yet, so here’s how it works. You make a single crochet, chain 1, skip the next stitch, and single crochet again. On the next row, each new single crochet goes into the little ch-1 space below it, and you chain over the single crochets. Every row shifts by one stitch, so the bumps sit in a brick pattern, a lot like woven cloth. You may also see it called linen stitch or granite stitch.
The counting trips most people up at first: each single crochet counts as one stitch, and so does each ch-1 space, for 29 stitches per row. Odd rows have 15 sc and 14 spaces. Even rows have 16 sc and 13 spaces, because they start and end with two single crochets side by side, and those doubled edge stitches are what keep the sides of each square straight. If abbreviations like sk and ch-1 sp still slow you down, the Beginner Guide shows how to read a crochet pattern one line at a time.
The one new technique is the slip stitch join. You fold two squares with their wrong sides together and slip stitch through both edges, which leaves a small raised chain on the right side.
Worsted weight #4 for 56 squares that line up
Look for the number 4 on the label, often with “worsted” or “medium.” A 5.5 mm hook, a little bigger than most worsted labels suggest, opens the moss stitch just enough for the throw to drape.
A soft acrylic or acrylic and wool blend is the easy choice: warm, machine washable, and easy to find in a heathered sage. Those flecks of gray and cream make the middle squares look like the spot where a dark stripe and a light stripe cross.
The biggest trap with this pattern is mixing brands. Two worsted yarns with the same label number can differ in thickness, and a cream square in a thinner yarn comes out smaller than its forest green neighbor. Across eight rows of squares, the grid stops lining up. Buy all four colors from the same yarn line, and buy each color in one go so the skeins share a dye lot, the batch number printed on the label.
Your first square is your gauge swatch. Make it, then measure: it should be about 7 1/4 in (18.5 cm) on each side. If it’s bigger, switch to a smaller hook; if it’s smaller, go up a size. A DK yarn would give squares closer to 6 in with the same counts, so don’t substitute a lighter weight without redoing the math.
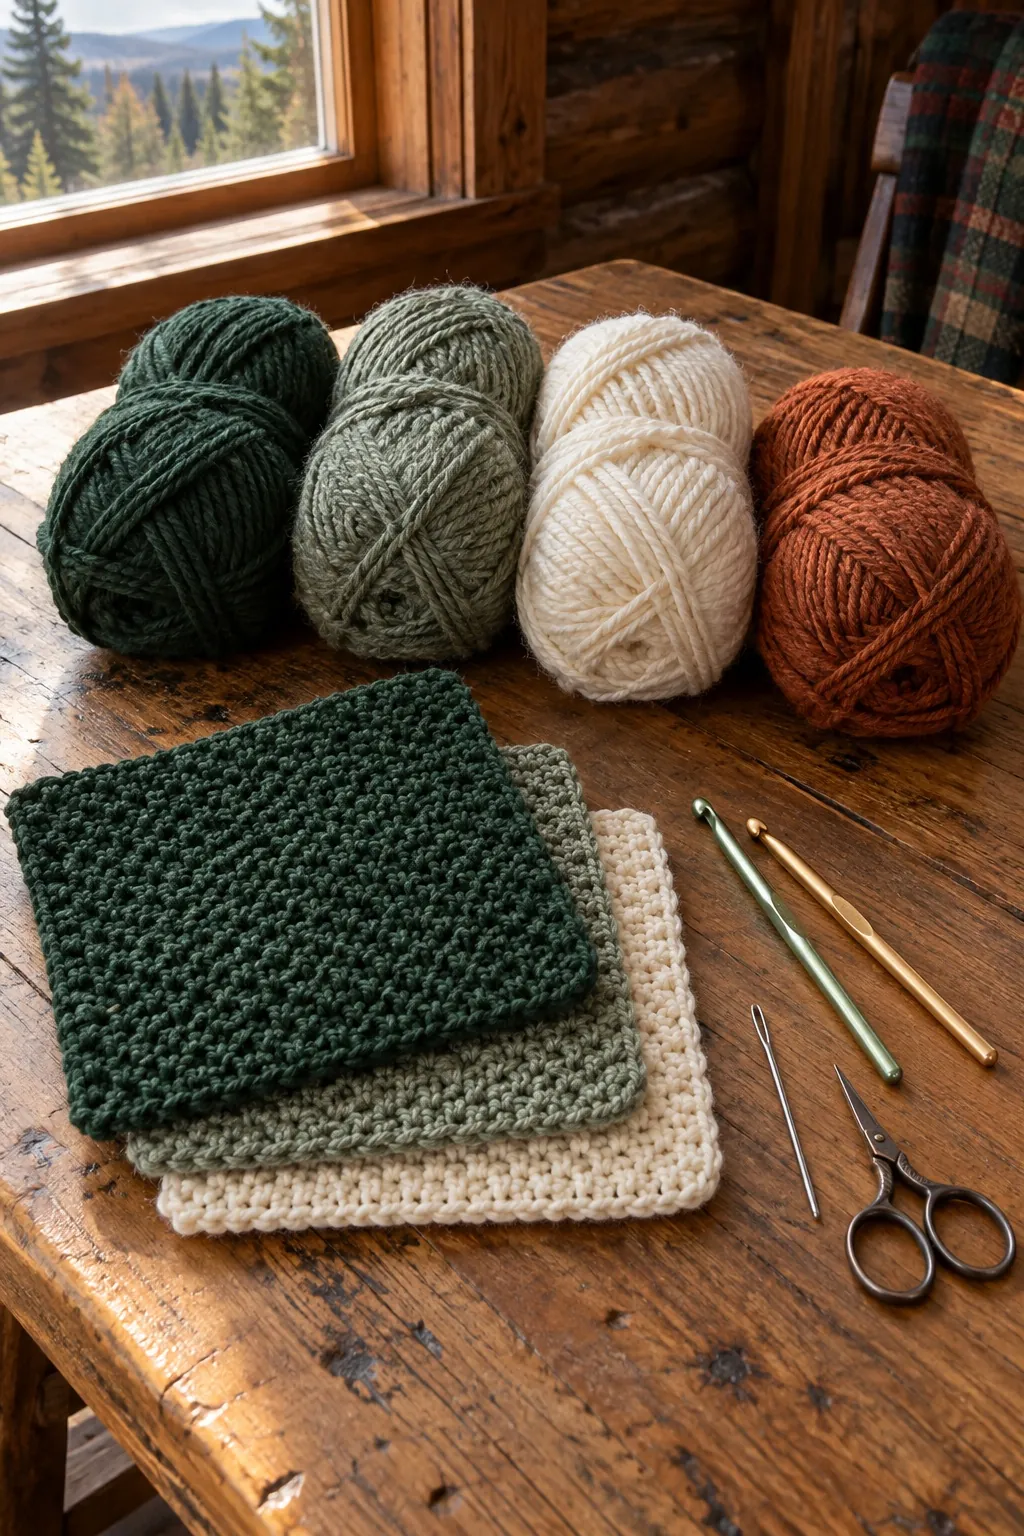
Forest, sage, cream and rust: what each shade does in the plaid
Forest green fills 16 dark squares and the border, so it frames the throw. Sage is the busy one: 28 squares, exactly half the blanket, between every dark and light square. Cream gives you 12 bright squares, the light checks of the flannel. Rust never makes a square, but it runs through every row and column of seams, and that’s what turns a checkerboard into plaid.
A few combinations that keep the same balance:
- Cabin Plaid: forest green, sage heather and cream, with rust seams.
- Harbor Fog: navy, gray heather and white, with mustard seams.
- Cranberry Bog: burgundy, oatmeal heather and ivory, with forest green seams.
- Woodstove: charcoal, light gray heather and cream, with red seams.
Before you buy, photograph the three square colors side by side in black and white mode on your phone. You should see three clearly different grays; if two match, the plaid flattens out. The seam color needs to stand out against all three, or the lines vanish on the squares that match it.
Cabin Plaid square counts, from baby to queen
Every size uses the same square: ch 30, 33 rows, about 7 1/4 in. Only the grid changes, with dark rows (forest, sage, forest…) alternating with light rows (sage, cream, sage…). The pattern is written for the throw.
- Baby, about 38 × 39 in (97 × 98 cm): 5 × 5 squares, 25 in all (9 forest, 12 sage, 4 cream), 4 horizontal and 4 vertical seams. Border Round 1: 600 sc, 147 along each edge between the corners. Yarn: about 600 yd forest, 600 yd sage, 200 yd cream and 100 yd rust (1,370 m in all).
- Throw, about 53 × 61 in (134 × 154 cm): 7 squares across and 8 down, 56 in all (16 forest, 28 sage, 12 cream), 7 horizontal and 6 vertical seams. Border Round 1: 900 sc, 207 along the top and bottom and 237 along each side. Yarn: about 1,000 yd forest, 1,400 yd sage, 600 yd cream and 150 yd rust (2,880 m in all).
- Twin, about 67 × 90 in (171 × 229 cm): 9 across and 12 down, 108 in all (30 forest, 54 sage, 24 cream), 11 horizontal and 8 vertical seams. Border Round 1: 1,260 sc, 267 along the top and bottom and 357 along each side. Yarn: about 1,800 yd forest, 2,700 yd sage, 1,200 yd cream and 300 yd rust (5,490 m in all).
- Queen, about 89 × 90 in (226 × 229 cm): 12 across and 12 down, 144 in all (36 forest, 72 sage, 36 cream), 11 seams each way. Border Round 1: 1,440 sc, 357 along each edge. Yarn: about 2,150 yd forest, 3,600 yd sage, 1,800 yd cream and 450 yd rust (7,320 m in all).
For the border, every square edge takes 29 sc and every seam 1, and the corner stitches move into the 3-sc groups: each edge gets 30 sc per square, minus 3.
The yardage is an estimate: about 45 yd per square, the border added to the forest, about 1 1/2 in of rust per seam slip stitch, then 10% extra (15% for rust), rounded up to the nearest 50 yd.
The baby size works for the stroller, floor play or a toddler’s nap. Babies under 12 months should sleep with no loose blankets. If you’d rather make a baby blanket in one piece, Maple Lane’s single crochet stripes are worked in bulky yarn.
Keeping 56 squares the same size and the rust ridges flat
- Read the edges, not every stitch. Even rows begin and end with two sc side by side, odd rows with sc, ch 1. A wrong edge usually means a skipped first ch-1 space or a forgotten last sc.
- Mark the right side. Keep the foundation tail at the bottom left when Row 1 faces you (bottom right if you’re left-handed), so you know which way up each square goes.
- Measure every fifth square. Tension drifts in front of a movie. Redo any square more than 1/4 in off your first one.
- Block the squares in batches. Pin a few to 7 1/4 in on a towel, mist them, and let them dry. Moss stitch corners like to curl, and matching squares make the seams far easier.
- Weave in tails as you go. The throw has 112 square tails, and a whole weekend of them at the end is no fun.
- Loosen up for the seams. Tight slip stitches make the seams shorter than the squares, and the throw puckers. The 6 mm hook keeps each ridge as long as the edge it joins.
- Lay everything out first. Arrange all 56 squares on the floor, take a photo, and keep it beside you while you join.
US crochet terms
The pattern
Materials
- Worsted weight yarn (weight 4), a soft, washable acrylic or acrylic and wool blend, all four colors from the same yarn line: about 3,150 yd (2,880 m) in total.
- A, forest green: about 1,000 yd (914 m)
- B, sage heather: about 1,400 yd (1,280 m)
- C, cream: about 600 yd (549 m)
- D, rust: about 150 yd (137 m)
- Yardage is an estimate with about 10% extra. With 200 yd (183 m) skeins: 5 of A, 7 of B, 3 of C and 1 of D.
- 5.5 mm (I-9) crochet hook, for the squares and border
- 6 mm (J-10) crochet hook, for the seams
- Yarn needle
- Scissors
- Stitch markers or scraps of yarn
Gauge
16 sts and 18 rows = 4 in (10 cm) in moss stitch, counting each sc and each ch-1 sp as 1 st.
One square (29 sts and 33 rows) measures about 7 1/4 in (18.5 cm) wide and 7 1/3 in (18.5 cm) tall. Make one square and measure it before you go on: if it’s bigger, try a smaller hook; if it’s smaller, try a bigger hook.
Finished size
About 53 × 61 in (134 × 154 cm) including the border, after light blocking: 7 squares across and 8 squares down.
Abbreviations
- ch chain
- ch-1 sp chain-1 space
- rep repeat
- RS right side
- sc single crochet
- sk skip
- sl st slip stitch
- sp(s) space(s)
- st(s) stitch(es)
- WS wrong side
Notes
- Moss stitch: each sc and each ch-1 sp counts as 1 st. Every row of a square has 29 sts.
- The ch 1 at the beginning of each row does not count as a stitch.
- Odd rows begin and end with 1 sc (15 sc and 14 ch-1 sps). Even rows begin and end with 2 sc side by side (16 sc and 13 ch-1 sps).
- Row 1 is the RS. Keep the foundation tail at the bottom left when the RS faces you (bottom right if you crochet left-handed).
- Leave 6 in (15 cm) tails and weave each one into a square of its own color.
- Place every square with its foundation chain at the bottom, so all the rows run the same way.
- Border side edges: on each square, work 29 sc over its 33 row ends: (sc in next 7 row ends, sk next row end) 4 times, sc in last row end. On the corner squares, the 3-sc corner group takes the place of the sc in the corner.
Instructions
Squares
Make 56 squares: 16 in A, 28 in B and 12 in C.
- Foundation: Ch 30.
- Row 1 (RS): Sc in 2nd ch from hook, *ch 1, sk next ch, sc in next ch; rep from * across. (15 sc, 14 ch-1 sps: 29 sts)
- Row 2: Ch 1, turn. Sc in first sc, sc in next ch-1 sp, *ch 1, sk next sc, sc in next ch-1 sp; rep from * to last sc, sc in last sc. (16 sc, 13 ch-1 sps: 29 sts)
- Row 3: Ch 1, turn. Sc in first sc, *ch 1, sk next sc, sc in next ch-1 sp; rep from * to last 2 sts, ch 1, sk next sc, sc in last sc. (15 sc, 14 ch-1 sps: 29 sts)
- Rows 4–33: Rep Rows 2 and 3 fifteen more times. Fasten off. (29 sts)
Layout
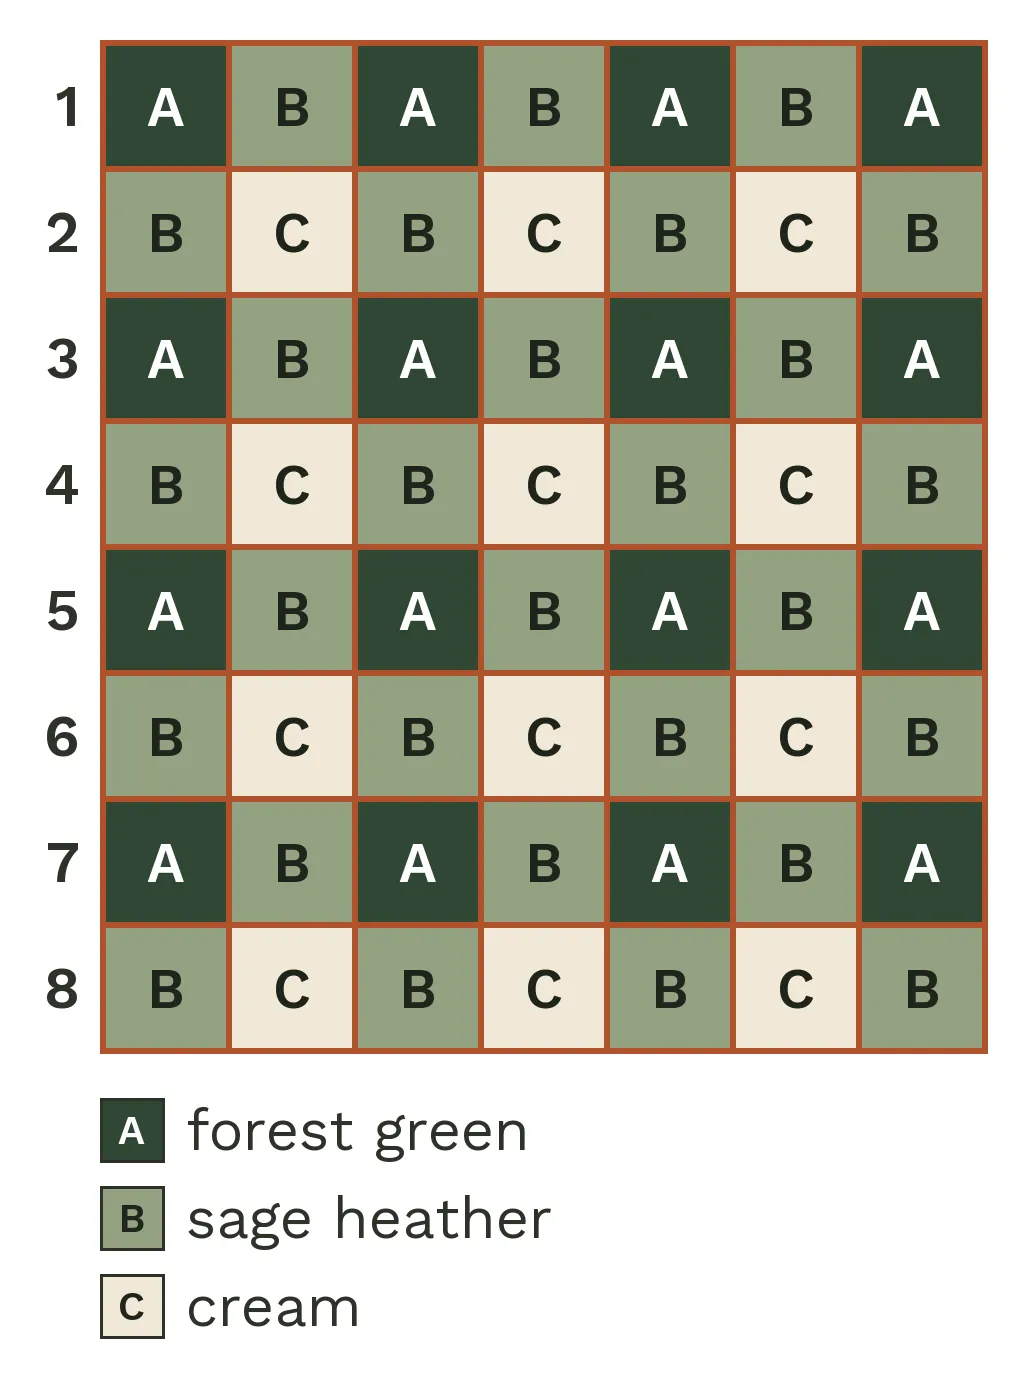
Lay the squares RS up in 8 rows of 7, foundation chains at the bottom. Rows of squares are numbered from the top.
- Rows of squares 1, 3, 5 and 7: A, B, A, B, A, B, A.
- Rows of squares 2, 4, 6 and 8: B, C, B, C, B, C, B.
Joining
All seams are worked with D and the 6 mm hook. Fold along the seam line so the two pieces are WS together and the RS faces out: each seam then forms a raised ridge on the RS. Keep your slip stitches loose.
- Horizontal seams: Fold along the line between rows of squares 1 and 2. Make a slip knot on the hook. Working through both layers, sl st in each st of the first pair of squares, joining the top edge of the lower square to the foundation edge of the upper square (29 sl sts). *Ch 1, sl st in each st of the next pair of squares (29 sl sts); rep from * to the end. Fasten off. (203 sl sts and 6 ch) Rep between each pair of rows of squares, for 7 seams.
- Vertical seams: Fold along the line between the first and second columns of squares. Make a slip knot on the hook. Working through both layers, sl st in each row end (33 sl sts on each square) and 1 sl st in the ch where each horizontal seam crosses. Fasten off. (271 sl sts) Rep between each pair of columns, for 6 seams.
Border
Work with A and the 5.5 mm hook, RS facing.
- Round 1: Join A with a sl st in the top right corner st, ch 1 (does not count as a st), 3 sc in the same st (corner). Working across the top, sc in each st and 1 sc in each seam to the last st, 3 sc in the last st (corner). Working down the side, sc in the row ends as given in Notes, with 1 sc in each seam. Work the bottom edge into the foundation chains like the top edge, and the second side like the first, with 3 sc in each corner. Sl st in the first sc to join. (207 sc along the top and bottom and 237 sc along each side between the corner groups: 900 sc)
- Rounds 2–4: Ch 1 (does not count as a st), sc in each sc around, working 3 sc in the center sc of each corner. Sl st in the first sc to join. (908 sc, then 916 sc, then 924 sc)
Finishing
- Finishing: Fasten off and weave in the remaining ends. Lay the throw flat, mist it lightly with water and let it dry.
Washing a plaid where forest green sits next to cream
Dark greens and rusts bleed more easily than most colors, and here they touch cream on every side. Before you join anything, wash one forest square, one rust swatch and one cream square together in a bowl of cool water. If the cream picks up any tint, wash the throw with a color-catcher sheet every time.
Most acrylic worsted can go in the machine. Wash the throw on its own, cold and gentle, and follow the most delicate of your four labels. Tumble on low only if all four allow it, and finish it flat while still a little damp so the squares settle back into line. Lift it out of the washer with both arms rather than by one corner, and store it folded, not hung.
Questions about joining a plaid from squares
Can I make this crochet plaid blanket in one piece instead of squares?
Not with this pattern. A plaid in one piece means changing colors in the middle of every row and carrying several strands, which is a bigger step than a first blanket needs. Squares keep every piece in a single color, and the rust seams draw the plaid for you. If you’d rather skip joining altogether, a striped throw worked in one piece is a gentler start.
Why is my square a little taller than it is wide?
It’s meant to be very slightly taller: 33 rows come to about 7 1/3 in, against 7 1/4 in across, and blocking evens that out. If yours is more than 1/2 in off, change the number of rows, keeping it odd so the top edge matches Row 1. The border side counts change with it.
What do the seams look like on the back?
On the WS, each seam shows as a flat line of rust stitches instead of a ridge. The plaid still reads from the back, just more softly, so the throw isn’t fully reversible. Keep the RS up on the bed or the sofa.
Can I join the squares in sage instead of rust?
Yes. You’ll lose the overcheck lines, and the throw turns into a softer three-color check. Forest green seams give a bolder, darker grid.
Quick recap
- Make 56 moss stitch squares of 29 sts and 33 rows: 16 in forest green, 28 in sage and 12 in cream.
- Lay them out in 8 rows of 7, alternating dark rows and light rows, foundation edges at the bottom.
- Join the 7 horizontal seams in rust slip stitch, through both layers, with the RS facing out.
- Join the 6 vertical seams, with 1 sl st over each crossing.
- Work 4 rounds of single crochet in forest green, then weave in the ends.
Once your crochet plaid blanket is finished, spread it over the bed like a cabin quilt and enjoy seeing all 56 squares together for the first time. If a square or a seam gives you trouble along the way, write to me through the Contact page and tell me where you’re stuck.