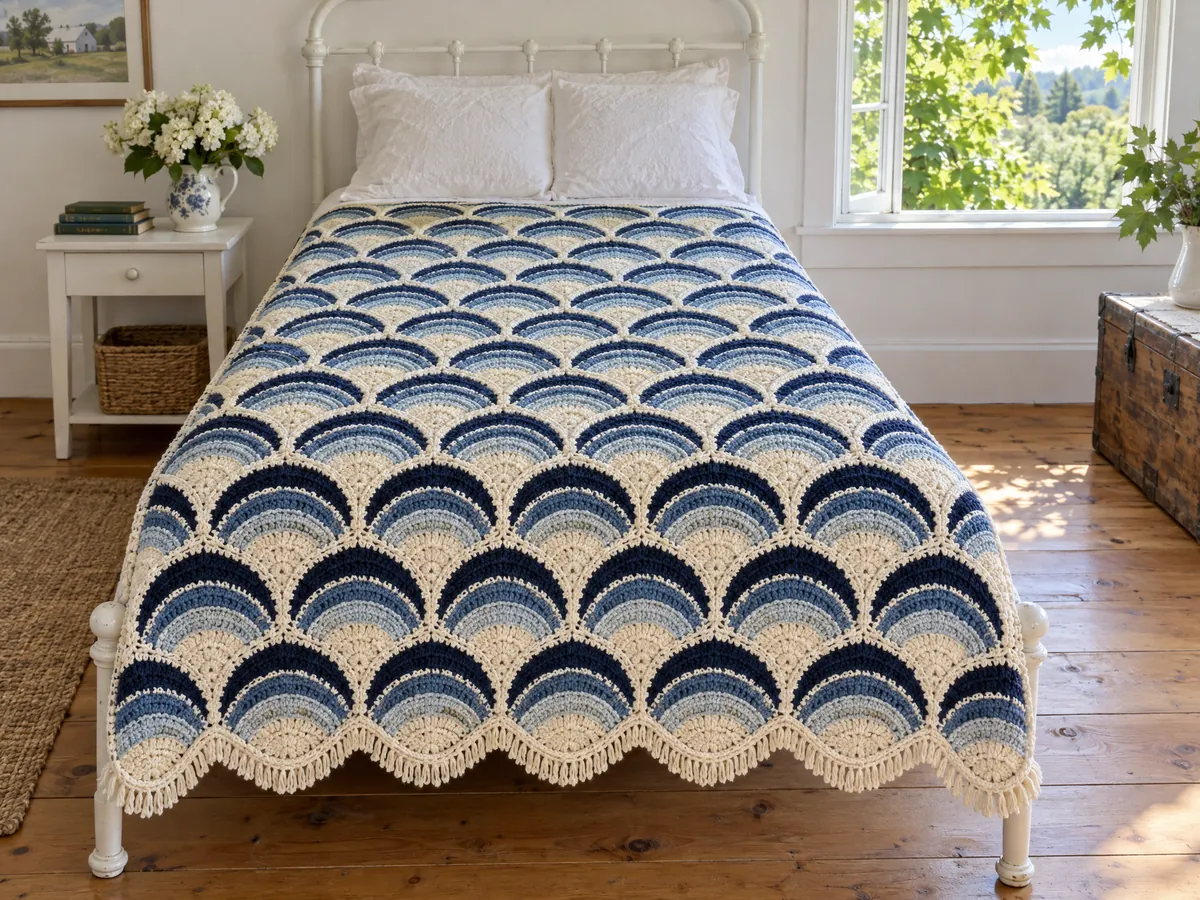
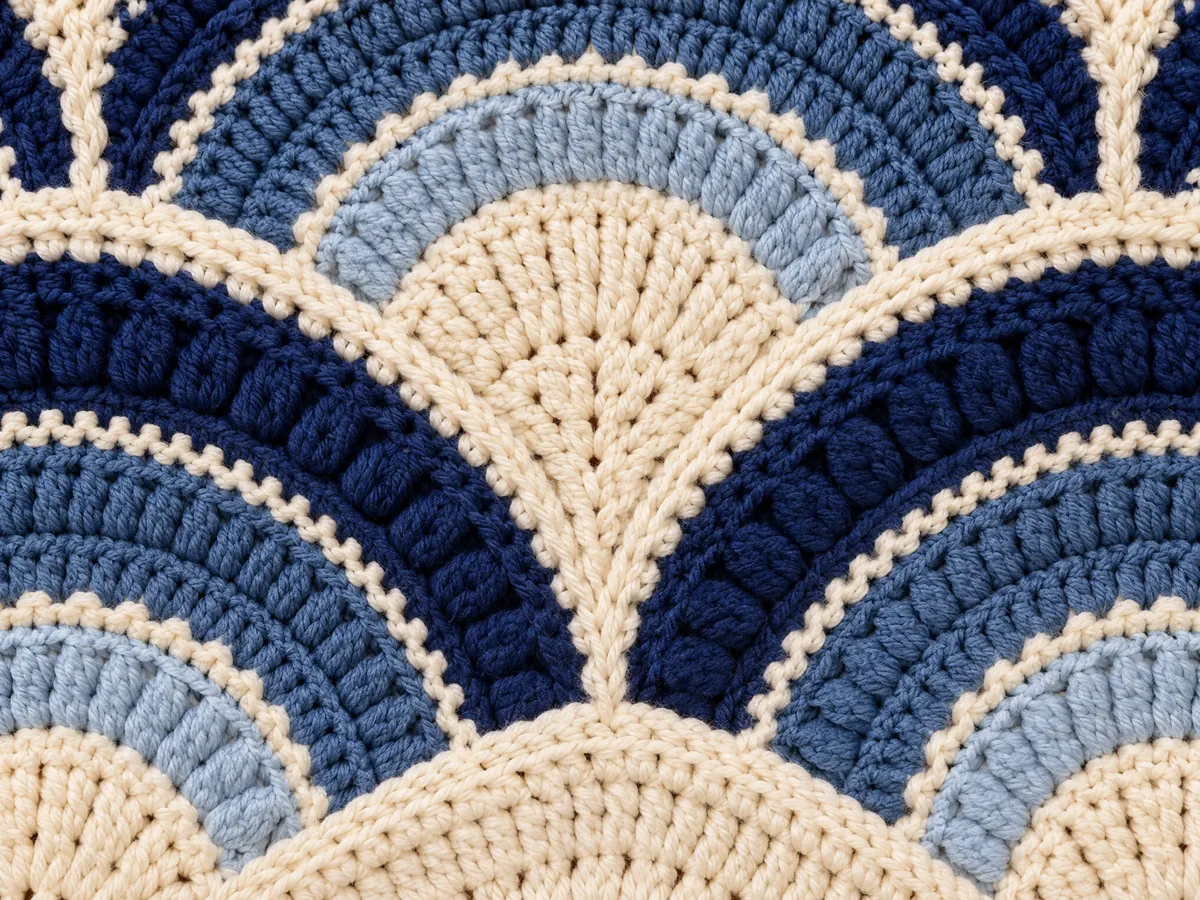
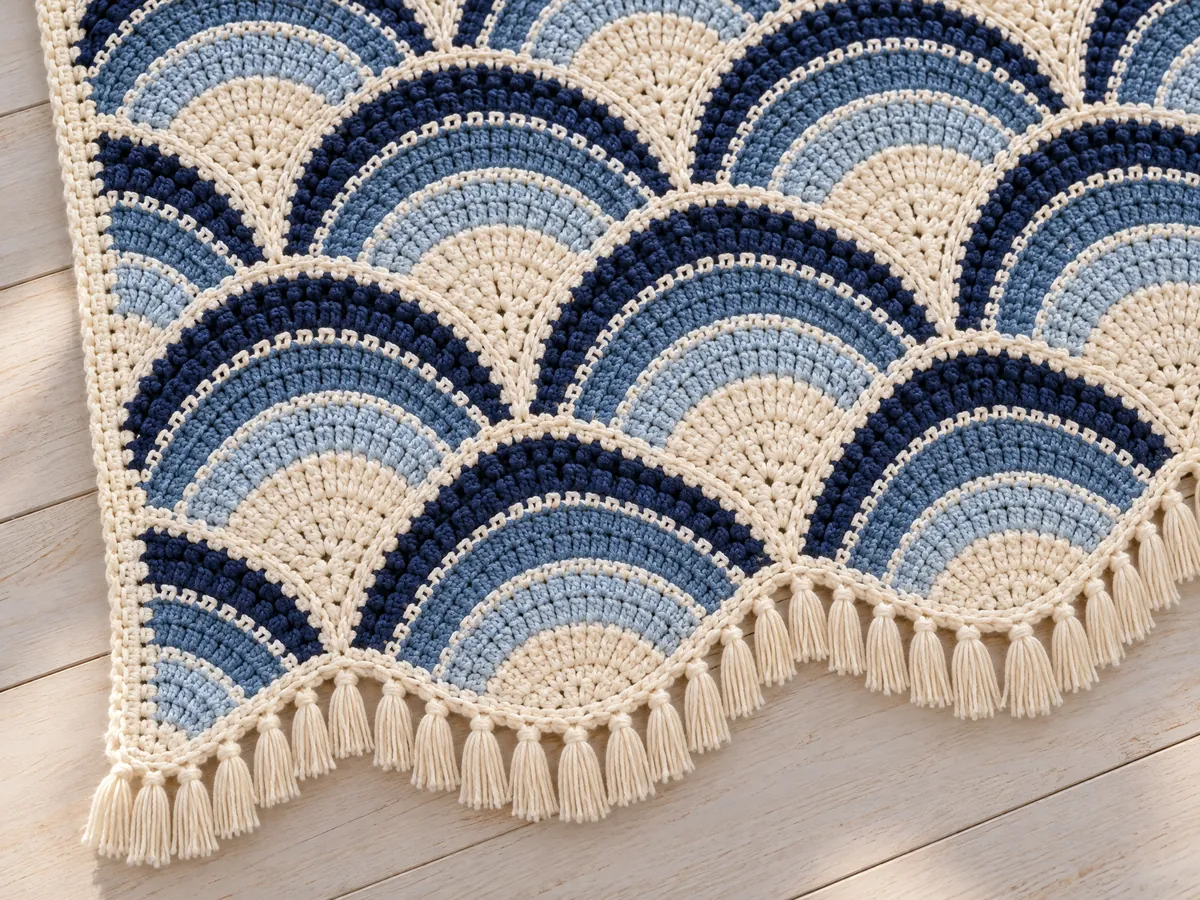
Picture a June evening on a lake porch, the water going from pale blue near the dock to deep navy farther out, and a crochet fan afghan on the daybed that carries the same shading in its arcs. Every piece starts as a single stitch and opens, row by row, into a cream fan with three rows of popcorns in mist blue, denim and navy.
Sewn in offset rows, the fans nest into one another like fish scales. The top and bottom ends stay scalloped, and the bed sizes end in a short cream fringe. The pattern below covers a stroller blanket, a twin and a queen, from the first chain of the first fan to the last knot of the fringe.
Is this crochet fan afghan a good next step after rows?
It’s rated Intermediate, but every stitch in it is a basic one: the chain, single crochet and double crochet. The fan starts on a two-stitch chain with one single crochet, then grows by two stitches a row until Row 10 holds 19. If the abbreviations look new, the guide to reading a crochet pattern covers them.
Two things make it a step up. The popcorn is new for many people: 4 double crochets worked in the same stitch, then closed together so they puff out like a little knob. The card explains how to close it from front to back so it always pops toward the right side. The other is the assembly. Each fan is sewn to two fans below it, with an exact stitch match for every seam, and the side edges use two mirror-image half fans.
The shape comes from Rows 12 and 16. The single crochet rows right after the first two popcorn rows add more stitches than a plain triangle would need: Row 12 jumps from 19 to 25 stitches, Row 16 from 29 to 43. That extra width bends the arcs and rounds the top of each fan into a scallop.
Smooth worsted yarn that shows every popcorn
Look for a 4 on the label, with worsted or medium next to it. The amounts in the card assume skeins of about 200 yd (183 m) and a 4 mm (G-6) hook. A smooth yarn shows the popcorns best. Wool, a wool blend, acrylic or a cotton blend all suit the fans, and a cotton blend feels right for a summer porch.
For the stroller size, pick a soft yarn that goes in the washer. Skip fuzzy or brushed yarns everywhere: the halo fills the gaps around the popcorns and the arcs lose their texture.
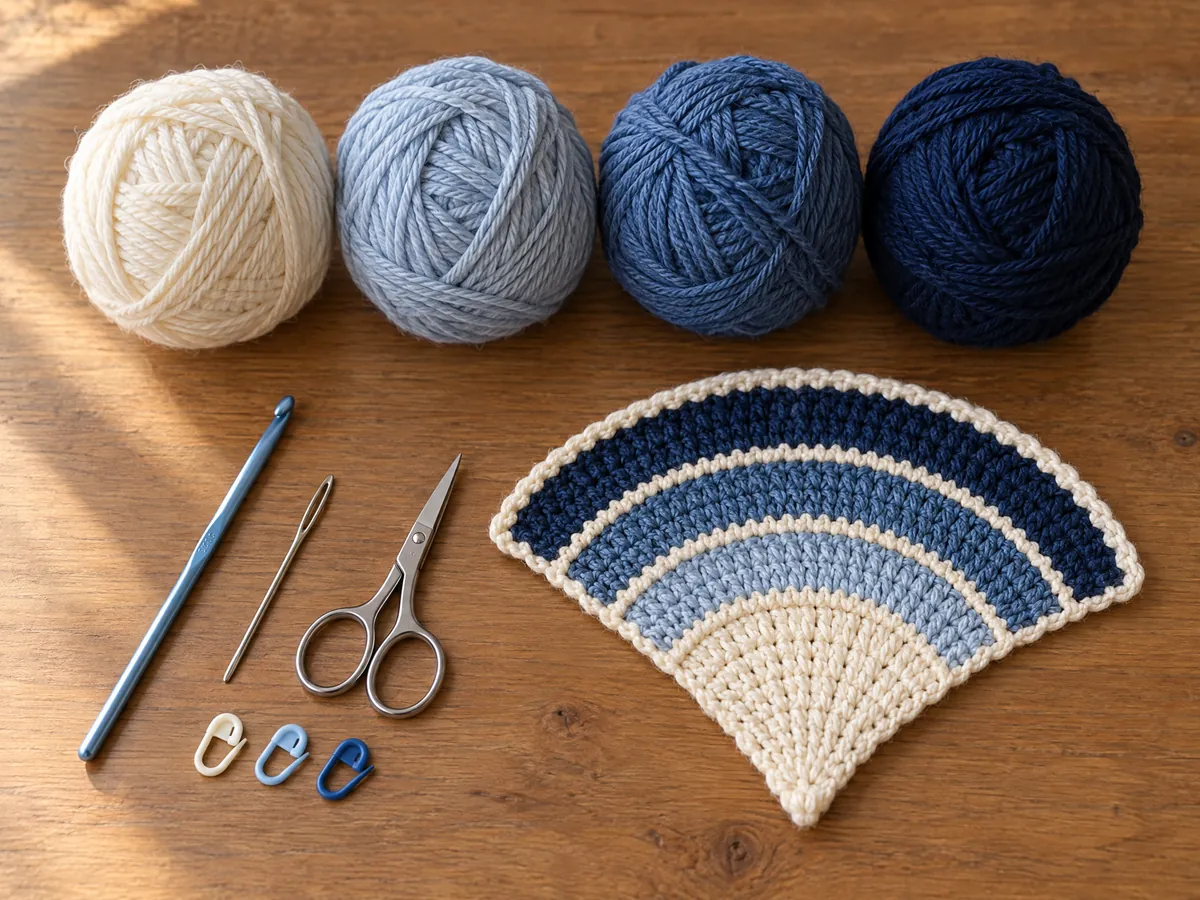
Cream is the big purchase: it fills the point of every fan, the lines between the arcs, the seams, the side edging and the fringe. For the twin that’s about 4,933 yd of cream. Buy each color from one dye lot. A slightly different blue shows as a band of odd arcs across the afghan.
Shading three arcs from pale to deep
Every fan keeps the same color order. A fills the point and the thin lines between the arcs, then B, C and D run from the palest arc to the deepest. Swap the four colors and the shading carries over to any palette, as long as B, C and D really step from light to dark.
- Tidewater: A cream, B mist blue, C denim, D deep navy, as written.
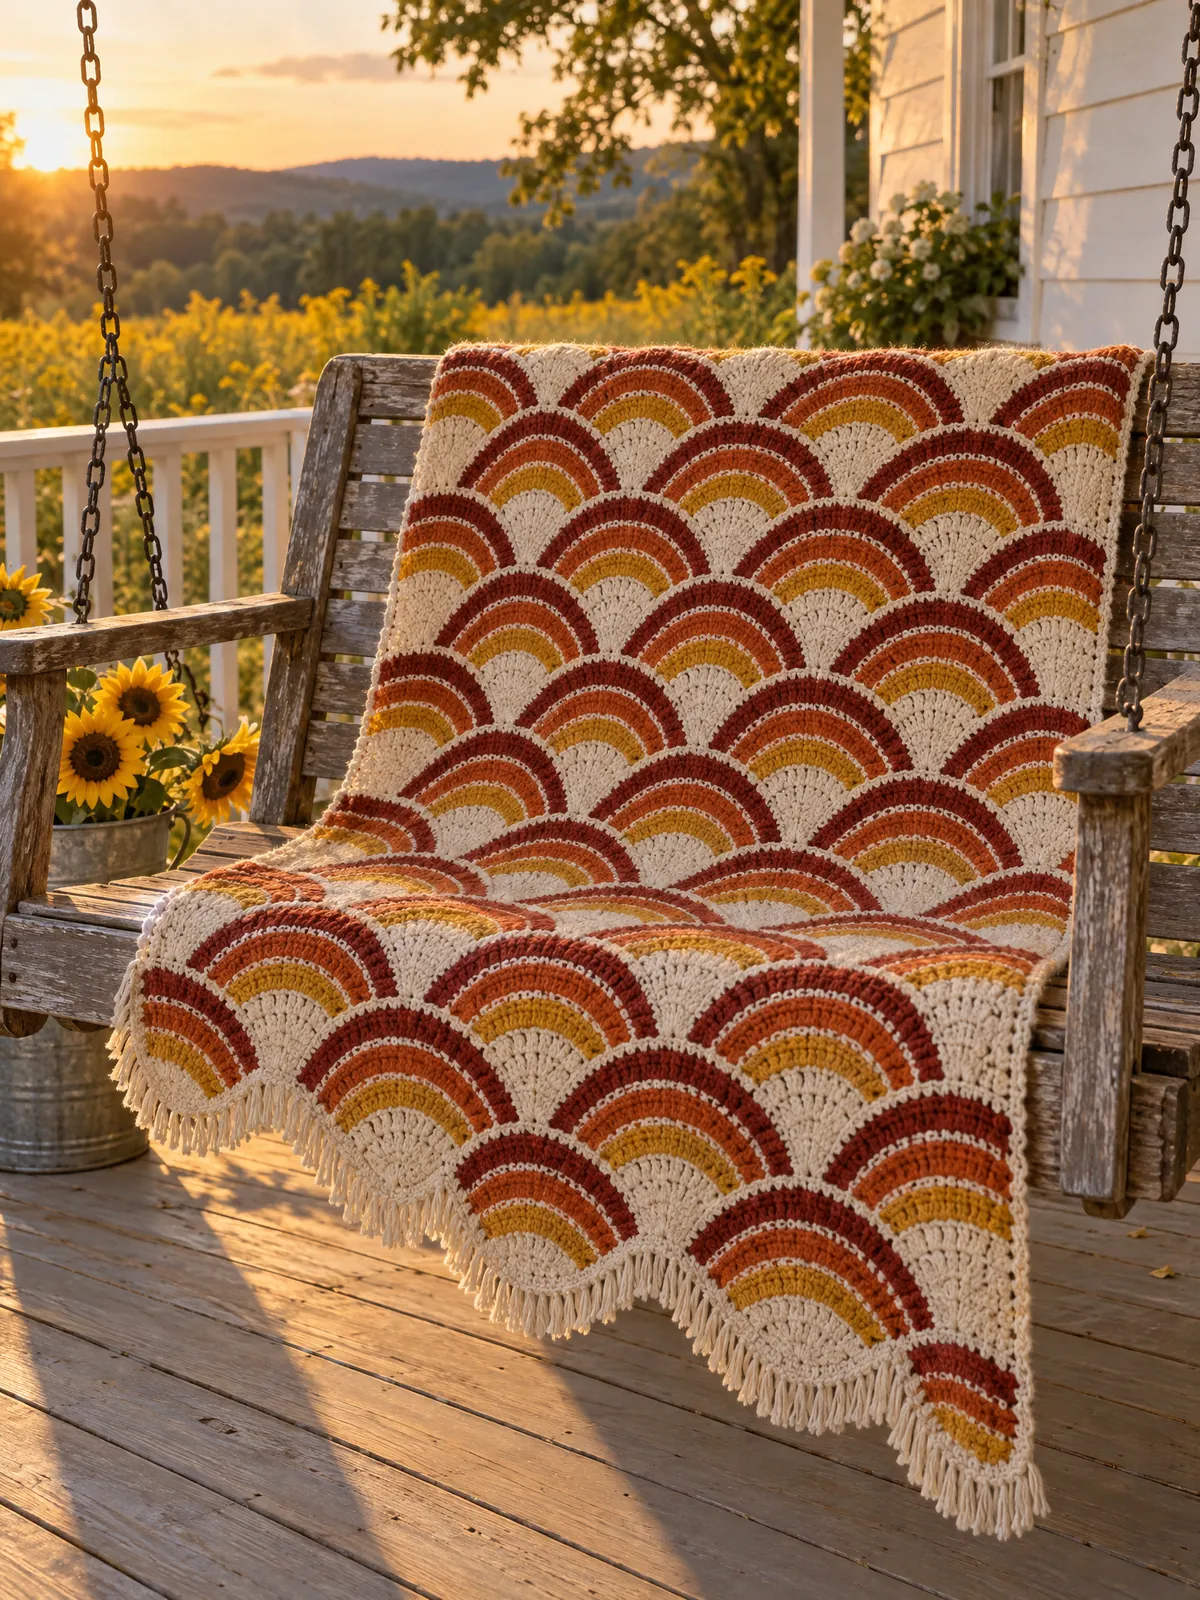
- Sunset Porch: A cream, B mustard, C burnt orange, D rust.
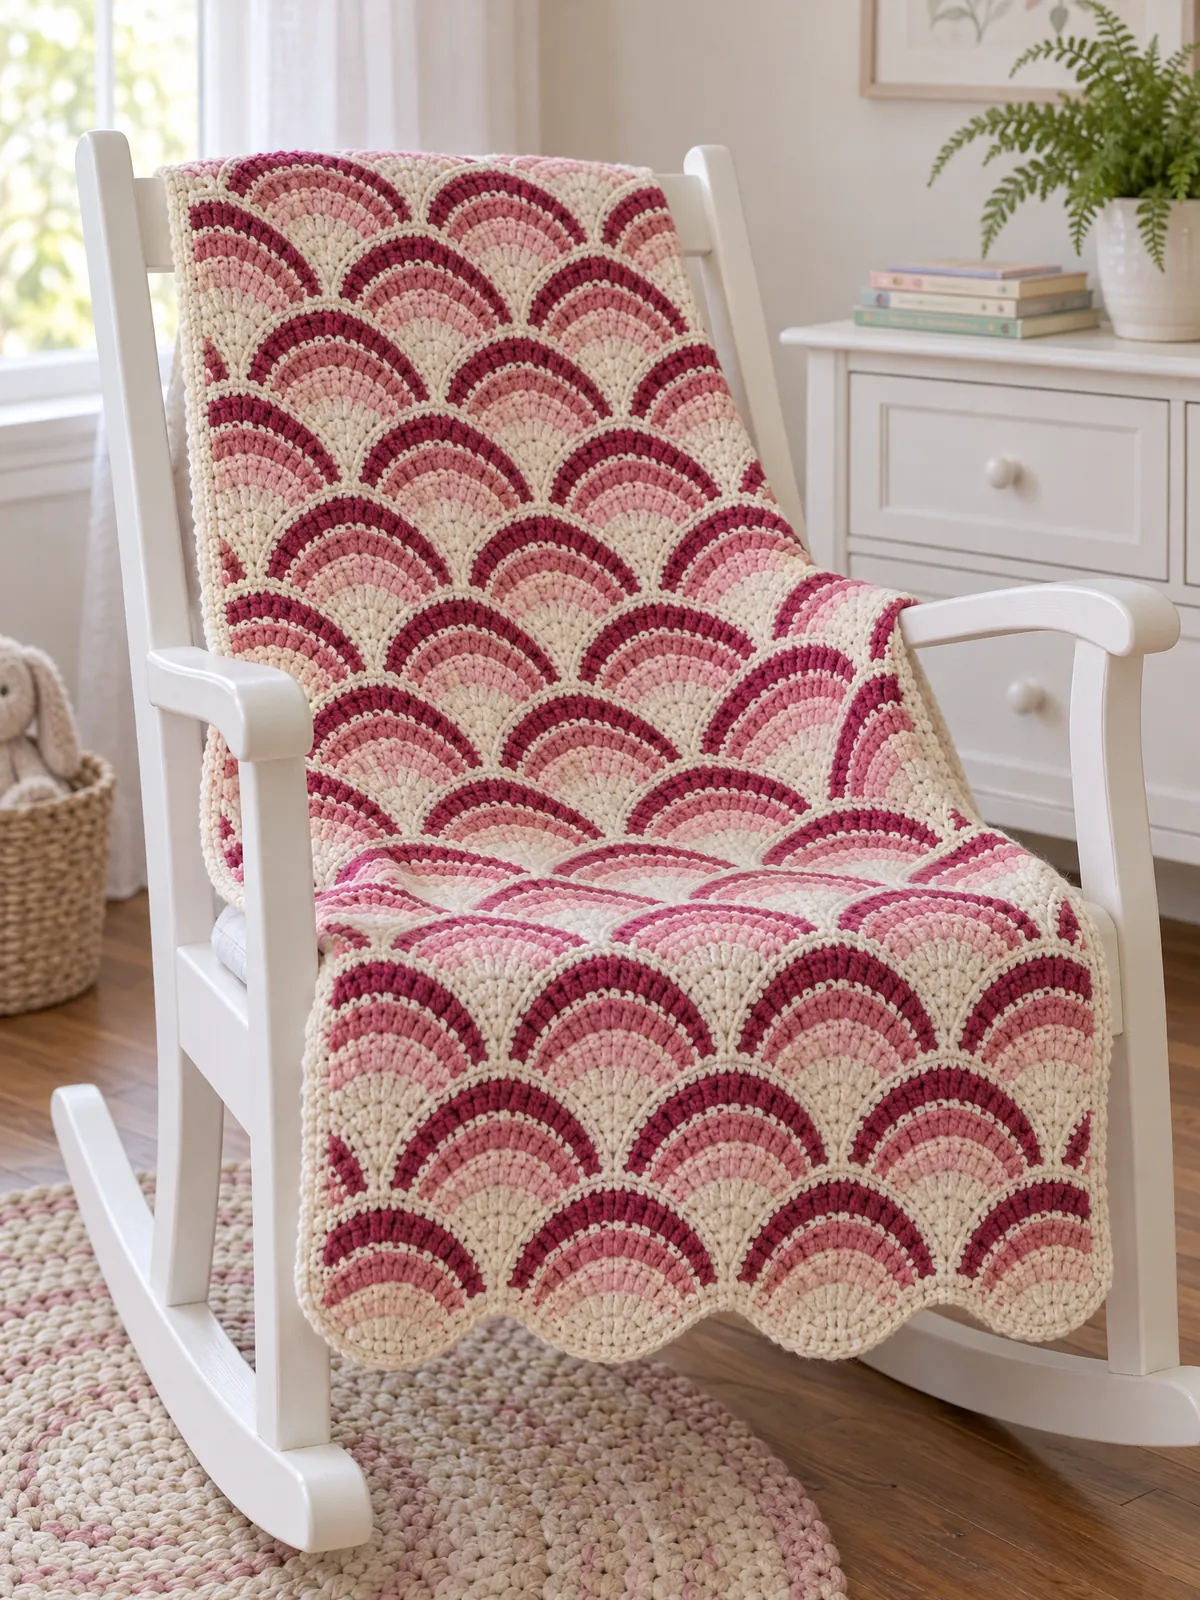
- Blush Nursery: A cream, B shell pink, C rose, D berry, a sweet choice for the stroller size.
- Sage Garden: A cream, B pale sage, C sage, D forest green.

To check a palette, lay the three arc colors side by side and take a black-and-white photo. You should see three clearly different grays, with the deepest one at D.
Stroller, twin and queen in whole fans
The fan and the two half fans are the same in every size; only the number of pieces changes. One more fan across adds about 11 in (28 cm) to the width, and two more rows of fans add about 6 in (15 cm) to the length. The card is written as Stroller [Twin, Queen], and the lengths are measured from tip to tip of the scalloped ends.
- Stroller: about 36 × 44 in (91 × 112 cm). 35 fans and 14 half fans in 13 rows, 6 edging rows on each side, no fringe. A 1,247 yd, B 299 yd, C 597 yd, D 706 yd.
- Twin: about 67 × 92 in (170 × 234 cm). 165 fans and 30 half fans in 29 rows, 2 edging rows, 316 fringes. A 4,933 yd, B 1,162 yd, C 2,322 yd, D 2,745 yd.
- Queen: about 89 × 98 in (226 × 249 cm). 240 fans and 32 half fans in 31 rows, 2 edging rows, 420 fringes. A 6,973 yd, B 1,644 yd, C 3,286 yd, D 3,884 yd.
The stroller size has no fringe on purpose: loose strands aren’t safe for a baby. For a baby under 12 months, keep any loose blanket out of the crib and use it for supervised play, stroller rides and cuddles.
Popcorns, half fans and seams that line up
Make one fan and block it before you start the others. It should measure 11 in (28 cm) across Row 22 and 5 1/2 in (14 cm) from the point to the center. The whole size of the afghan follows from that one fan.

On the popcorn rows, the ch 3 at the start counts as the first double crochet, and the next row ends in the top of that chain. Missing it is the usual reason a fan comes up one stitch short. In the row after a popcorn row, work into the closing chain on top of each popcorn, not into the side of the knob.
Keep the two kinds of half fan in separate bags from the start, and label them. The right half fan has its straight edge on the right when the right side faces you; the left one is its mirror image. Mixing them up means a straight edge ends up in the middle of the afghan.
Lay out the whole afghan on a bed or a clean floor before you sew anything, and take a photo. Then sew from the bottom up: each fan sits in the valley between two fans below and takes two seams. Pin the point, the corner and the three popcorn rows of each side first, and the arcs will meet across the seams.
Expect about 14 tails per piece. Working over the new color’s tail for 8 stitches takes care of about half of them; weave in the rest as each fan is finished.
If you like blues on a bed, the wavy bedspread in lake blues is worked in one piece instead of motifs. For another afghan of motifs set in offset rows, try the star motifs joined into staggered strips.
US crochet terms
The pattern
Materials
- Worsted weight yarn (#4), wool, wool blend, acrylic or cotton blend, about 200 yd (183 m) per skein, in 4 colors (estimate):
- A, Cream (points, lines between the arcs, seams, side edging and fringe): about 1,247 [4,933, 6,973] yd (1,140 [4,511, 6,376] m), 7 [25, 35] skeins, fringe included: 0 [81, 108] yd (0 [74, 99] m)
- B, Mist Blue: about 299 [1,162, 1,644] yd (273 [1,063, 1,503] m), 2 [6, 9] skeins
- C, Denim: about 597 [2,322, 3,286] yd (546 [2,123, 3,005] m), 3 [12, 17] skeins
- D, Deep Navy: about 706 [2,745, 3,884] yd (646 [2,510, 3,552] m), 4 [14, 20] skeins
- 4 mm (G-6) crochet hook
- Yarn needle with a large eye, for the tails and the seams
- Scissors
- Stitch markers or small safety pins, to mark the RS of each piece and to sort the half fans
- Blocking mats and rustproof pins
- Twin and Queen: a piece of stiff cardboard 2 in (5 cm) wide, for cutting the fringe
Gauge
One fan, blocked, measures 11 in (28 cm) across Row 22 and 5 1/2 in (14 cm) from the point to the center of Row 22, with a 4 mm (G-6) hook. Once the fans are sewn, the points of two consecutive rows sit about 3 in (7.5 cm) apart, measured straight up. Make one fan and block it before you start the others: if it’s larger, try a smaller hook; if it’s smaller, try a larger one. Estimate: your size may vary with your gauge.
Finished size
- Stroller: about 36 × 44 in (91 × 112 cm)
- Twin: about 67 × 92 in (170 × 234 cm)
- Queen: about 89 × 98 in (226 × 249 cm)
- Measured after blocking, from tip to tip of the scalloped ends; the width includes the side edging. Estimates based on the gauge above.
| Stroller | Twin | Queen | |
|---|---|---|---|
| Fans across (long rows / short rows) | 3 / 2 | 6 / 5 | 8 / 7 |
| Rows of fans | 13 | 29 | 31 |
| Full fans, bottom fans included | 35 | 165 | 240 |
| Right half fans | 7 | 15 | 16 |
| Left half fans | 7 | 15 | 16 |
| Pieces in all | 49 | 195 | 272 |
| Side edging rows, each side | 6 | 2 | 2 |
| Side edging, sc per row, each side | 175 | 375 | 400 |
| Fringes | none | 316 | 420 |
Abbreviations
- approx approximately
- ch chain
- dc double crochet
- pc popcorn (see Notes)
- rep repeat
- RS right side
- sc single crochet
- sl st slip stitch
- st(s) stitch(es)
- WS wrong side
Notes
- Sizes are written as Stroller [Twin, Queen]. A number given once applies to all sizes. The fan and the two half fans are the same in every size: only the number of pieces changes.
- There is no stitch multiple: the afghan grows by whole fans. One more fan across adds about 11 in (28 cm) to the width; two more rows of fans add about 6 in (15 cm) to the length.
- Every piece is worked in turned rows from its point. Row 1 is a RS row, so all odd rows are RS rows and all even rows are WS rows. Mark the RS of each piece with a stitch marker after Row 1.
- In sc rows, the ch 1 at the beginning does not count as a st.
- In popcorn rows (Rows 11, 15 and 19), the ch 3 at the beginning counts as the first dc. In the next row, the last st is worked in the top of this ch-3.
- Popcorn (pc): 4 dc in the same st, drop the loop from the hook, insert the hook from front to back under both top loops of the first dc of the group, pick up the dropped loop and pull it through, ch 1 to close. The closing ch does not count as a st; the popcorn counts as 1 st. In the next row, work into the top of the popcorn (its closing ch). Popcorns are always worked on RS rows, so they pop toward the RS.
- 2 sc in a st (or 3 sc) is an increase: work all the sts in the same st.
- Color changes: fasten off at the end of each color, leaving a 6 in (15 cm) tail. Turn the piece, then join the new color with a sl st in the first st of the next row, leaving a 6 in (15 cm) tail. Lay the new tail along the top of the row and work over it for at least 8 sts, then trim it. Each piece has about 14 tails, about 686 [2,730, 3,808] in all; working over the new tails as you go takes care of about half of them. Weave the others in on the WS as each piece is finished.
- Right and left half fans: the Right Half Fan has its straight edge on the right when the RS faces you, and goes on the right side of the afghan. The Left Half Fan is its mirror image and goes on the left side. One half fan of each kind, turned upside down, fills a bottom corner. Keep the two kinds in separate bags.
- Stroller size: no fringe. Add no buttons or sewn-on trims.
- Yardage and sizes are estimates based on the gauge above.
Instructions
Fan (make 35 [165, 240])
- Row 1 (RS): With A, ch 2, sc in 2nd ch from hook. (1 st)
- Row 2: Ch 1, turn, 3 sc in sc. (3 sts)
- Rows 3–10: Ch 1, turn, 2 sc in first st, sc in each st to last st, 2 sc in last st. (5, 7, 9, 11, 13, 15, 17, 19 sts at the end of Rows 3–10) At the end of Row 10, fasten off A.
- Row 11 (RS): Turn. Join B with sl st in first st, ch 3 (counts as dc), *pc in next st, dc in next st; rep from * 8 more times. (19 sts: 9 pc, 10 dc)
- Row 12: Ch 1, turn, 2 sc in first dc, *sc in next pc, sc in next dc, 2 sc in next pc, sc in next dc; rep from * 3 more times, sc in next pc, 2 sc in top of ch-3. Fasten off B. (25 sts)
- Row 13 (RS): Turn. Join A with sl st in first st, ch 1, 2 sc in same st, sc in each st to last st, 2 sc in last st. (27 sts)
- Row 14: Ch 1, turn, 2 sc in first st, sc in each st to last st, 2 sc in last st. Fasten off A. (29 sts)
- Row 15 (RS): Turn. Join C with sl st in first st, ch 3, *pc in next st, dc in next st; rep from * 13 more times. (29 sts: 14 pc, 15 dc)
- Row 16: Ch 1, turn, sc in first dc, *sc in next pc, 2 sc in next dc; rep from * 13 more times, working the last 2 sc in top of ch-3. Fasten off C. (43 sts)
- Rows 17–18: With A, work as Rows 13–14. At the end of Row 18, fasten off A. (45 sts, then 47 sts)
- Row 19 (RS): Turn. Join D with sl st in first st, ch 3, *pc in next st, dc in next st; rep from * 22 more times. (47 sts: 23 pc, 24 dc)
- Row 20: Ch 1, turn, 2 sc in first dc, sc in each st to last st, 2 sc in top of ch-3. Fasten off D. (49 sts)
- Rows 21–22: With A, work as Rows 13–14. At the end of Row 22, fasten off. (51 sts, then 53 sts)
Right Half Fan (make 7 [15, 16])
The straight edge is on the right when the RS faces you; all the edge increases fall on the left edge. Rows 10 and 12 also add 1 st on the straight edge, to keep an odd count for the popcorn rows.
- Row 1 (RS): With A, ch 2, sc in 2nd ch from hook. (1 st)
- Row 2: Ch 1, turn, 2 sc in sc. (2 sts)
- Rows 3–9: Ch 1, turn. On RS rows (Rows 3, 5, 7 and 9): sc in each st to last st, 2 sc in last st. On WS rows (Rows 4, 6 and 8): 2 sc in first st, sc in each st across. (3, 4, 5, 6, 7, 8, 9 sts at the end of Rows 3–9)
- Row 10: Ch 1, turn, 2 sc in first st, sc in each st to last st, 2 sc in last st. Fasten off A. (11 sts)
- Row 11 (RS): Turn. Join B with sl st in first st, ch 3, *pc in next st, dc in next st; rep from * 4 more times. (11 sts: 5 pc, 6 dc)
- Row 12: Ch 1, turn, 2 sc in first dc, *sc in next pc, sc in next dc, 2 sc in next pc, sc in next dc; rep from * once more, sc in next pc, 2 sc in top of ch-3. Fasten off B. (15 sts)
- Row 13 (RS): Turn. Join A with sl st in first st, ch 1, sc in same st, sc in each st to last st, 2 sc in last st. (16 sts)
- Row 14: Ch 1, turn, 2 sc in first st, sc in each st across. Fasten off A. (17 sts)
- Row 15 (RS): Turn. Join C with sl st in first st, ch 3, *pc in next st, dc in next st; rep from * 7 more times. (17 sts: 8 pc, 9 dc)
- Row 16: Ch 1, turn, sc in first dc, *sc in next pc, 2 sc in next dc; rep from * 5 more times, sc in next pc, sc in next dc, sc in next pc, sc in top of ch-3. Fasten off C. (23 sts)
- Rows 17–18: With A, work as Rows 13–14. At the end of Row 18, fasten off A. (24 sts, then 25 sts)
- Row 19 (RS): Turn. Join D with sl st in first st, ch 3, *pc in next st, dc in next st; rep from * 11 more times. (25 sts: 12 pc, 13 dc)
- Row 20: Ch 1, turn, 2 sc in first dc, sc in each st across, working the last sc in top of ch-3. Fasten off D. (26 sts)
- Rows 21–22: With A, work as Rows 13–14. At the end of Row 22, fasten off. (27 sts, then 28 sts)
Left Half Fan (make 7 [15, 16])
This is the mirror image of the Right Half Fan: the straight edge is on the left when the RS faces you, and all the edge increases fall on the right edge.
- Row 1 (RS): With A, ch 2, sc in 2nd ch from hook. (1 st)
- Row 2: Ch 1, turn, 2 sc in sc. (2 sts)
- Rows 3–9: Ch 1, turn. On RS rows (Rows 3, 5, 7 and 9): 2 sc in first st, sc in each st across. On WS rows (Rows 4, 6 and 8): sc in each st to last st, 2 sc in last st. (3, 4, 5, 6, 7, 8, 9 sts at the end of Rows 3–9)
- Row 10: Ch 1, turn, 2 sc in first st, sc in each st to last st, 2 sc in last st. Fasten off A. (11 sts)
- Row 11 (RS): Turn. Join B with sl st in first st, ch 3, *pc in next st, dc in next st; rep from * 4 more times. (11 sts: 5 pc, 6 dc)
- Row 12: Ch 1, turn, 2 sc in first dc, *sc in next pc, sc in next dc, 2 sc in next pc, sc in next dc; rep from * once more, sc in next pc, 2 sc in top of ch-3. Fasten off B. (15 sts)
- Row 13 (RS): Turn. Join A with sl st in first st, ch 1, 2 sc in same st, sc in each st across. (16 sts)
- Row 14: Ch 1, turn, sc in each st to last st, 2 sc in last st. Fasten off A. (17 sts)
- Row 15 (RS): Turn. Join C with sl st in first st, ch 3, *pc in next st, dc in next st; rep from * 7 more times. (17 sts: 8 pc, 9 dc)
- Row 16: Ch 1, turn, sc in first dc, sc in next pc, sc in next dc, sc in next pc, *2 sc in next dc, sc in next pc; rep from * 5 more times, sc in top of ch-3. Fasten off C. (23 sts)
- Rows 17–18: With A, work as Rows 13–14 of this Left Half Fan. At the end of Row 18, fasten off A. (24 sts, then 25 sts)
- Row 19 (RS): Turn. Join D with sl st in first st, ch 3, *pc in next st, dc in next st; rep from * 11 more times. (25 sts: 12 pc, 13 dc)
- Row 20: Ch 1, turn, sc in each st to last st, 2 sc in top of ch-3. Fasten off D. (26 sts)
- Rows 21–22: With A, work as Rows 13–14 of this Left Half Fan. At the end of Row 22, fasten off. (27 sts, then 28 sts)
Blocking
- Weave in the remaining tails. Pin each piece RS up and block it the way your yarn’s label allows (wet or steam). Fans: 11 in (28 cm) across Row 22 and 5 1/2 in (14 cm) from the point to the center of Row 22, both sides straight. Half fans: straight edge 5 1/2 in (14 cm), the top as long as half a fan. Let every piece dry before sewing, so all the edges match.
Layout
Lay out the whole afghan RS up on a bed or a clean floor before sewing anything, and take a photo of it.
- Direction: Every fan points down. Rows of fans are counted from the bottom.
- Odd rows: Rows 1, 3, 5 and every odd row up to Row 13 [29, 31] (7 [15, 16] rows): 3 [6, 8] fans side by side, touching only at their corners.
- Even rows: Rows 2, 4, 6 and every even row up to Row 12 [28, 30] (6 [14, 15] rows): 2 [5, 7] fans, each one sitting in a valley between two fans of the row below, with its point where those two fans touch. A Left Half Fan fills the gap at the left end of the row, straight edge on the outside; a Right Half Fan fills the gap at the right end.
- Bottom: 2 [5, 7] fans turned point up fill the gaps between the points of Row 1. A Right Half Fan turned upside down fills the bottom left corner (its straight edge is then on the left), and a Left Half Fan turned upside down fills the bottom right corner.
Joining
Sew with A and the yarn needle, holding two pieces RS together, so the seam ridge stays on the WS: pass the needle under both loops of each stitch top, and around the edge stitch of each row end, always in the same direction, and pull each stitch snug, not tight. Never start a new length of yarn where pieces meet at a point; join it in the middle of a seam.
Along a fan side (or the slanted edge of a half fan), from the point (Row 1) to the corner (Row 22), make 1 whipstitch in the end of each sc row and 2 in the end of each popcorn row (Rows 11, 15 and 19): 25 whipstitches. Pin the point, the corner and the three popcorn rows first.
- Fan side to the top of a fan below: 60 [308, 450] seams, the slanted edges of the side half fans included. The receiving edge is half of Row 22, from its corner st (st 1 or st 53) to its center st (st 27): 27 sts. Place the point of the upper piece at the corner st. Take the first whipstitch through the corner st and the next st together, then 1 st with each whipstitch, and the last whipstitch through sts 26 and 27 together. The center st (st 27) is shared by the two seams that meet there. The slanted edge of each side half fan is sewn the same way, its point at the outer corner of the fan below.
- Fan side to the top of a half fan: 12 [28, 30] seams, at the ends of the long rows. The receiving edge is Row 22 of the half fan, 28 sts. Place the point of the fan at the inner corner of the half fan. Take the first whipstitch through 2 sts, then 1 st with each whipstitch, and the last whipstitch through the last 3 sts, at the side edge.
- Bottom pieces, side to side: 6 [12, 16] seams. Each side of a bottom fan, and the slanted edge of each upside-down half fan, is sewn to a side of a fan in Row 1: 25 whipstitches on each piece, matched one for one, counted from the point of the bottom piece.
- Total: 78 [348, 496] seams.
- Order, step 1: Sew Row 2 onto Row 1: each fan of Row 2 takes two seams, one on each fan below. Continue row by row up to Row 13 [29, 31]. The outer side of the first and last fan of each long row, from Row 3 on, waits for the half fan below it.
- Order, step 2: Sew the Left and Right Half Fans into the gaps of the short rows: their slanted edge on the fan below, their top under the fan above.
- Order, step 3: Sew the bottom fans and the two upside-down half fans under Row 1.
Side edging
The side edging is worked along the straight edges of the half fans only.
- Edge Row 1 (RS): With the RS facing, join A with sl st at one end of a side edge, ch 1. On each half fan, work 1 sc in the end of each sc row and 2 sc in the end of each popcorn row (25 sc per half fan); where two half fans meet at the corner of a fan, go straight on to the next half fan. (175 [375, 400] sc)
- Edge Row 2: Ch 1, turn, sc in each sc across. (175 [375, 400] sc)
- Edge Rows 3–6, Stroller only: Work as Edge Row 2. (175 sc)
- Fasten off. Work the other side edge the same way: 6 [2, 2] edge rows on each side.
Fringe (Twin and Queen only)
Stroller: no fringe. Wrap A loosely around the 2 in (5 cm) cardboard and cut along one edge: each strand is 4 in (10 cm) long. Cut 632 [840] strands for the Twin [Queen]. For each fringe, fold 2 strands in half. With the WS facing, insert the hook from the WS to the RS under both loops of the stated st, pull the folded loop through, pull the ends through the loop and snug the knot against the edge.
- Top edge: In Row 22 of each fan of the top row, knot a fringe in sts 1, 3, 5 and every other st to st 53. Where two fans meet, st 53 of one and st 1 of the next sit side by side: knot one fringe through both together. (157 [209] fringes)
- Bottom edge: On each upside-down half fan, count the sts of Row 22 from the side edge and knot a fringe in sts 1, 3, 5 and every other st to st 27. On each bottom fan, knot a fringe in sts 1, 3, 5 and every other st to st 53, with one fringe through both sts where two bottom fans meet. (159 [211] fringes)
- Trim: Lay each end flat, comb the strands and trim them evenly to about 1 1/2 in (4 cm).
Finishing
- Weave in any remaining tails on the WS, following a seam where you can. Lay the finished afghan flat, smooth the scallops and the side edges, and give it a light final blocking as your yarn’s label allows.
Washing a fan afghan full of seams and popcorns
Follow the yarn label first. Washable wool, wool blends, acrylic and cotton blends can usually go in the machine on a gentle, cool cycle; put the stroller size in a large mesh laundry bag. Hand wash wool that isn’t machine washable. Wash a darker colorway like Sunset Porch or Sage Garden on its own the first time, in case the deepest color bleeds into the cream.
Dry the afghan flat and shape the scallops with your fingers while it’s damp. A wet twin or queen is heavy, so lift it with both arms rather than hanging it by one end: the seams stretch if the whole weight pulls on them.
Tidewater questions about fans, half fans and fringe
Is a crochet fan afghan hard to put together?
It takes time more than skill. Lay everything out first, then sew row by row from the bottom: each new fan takes two seams, one on each fan below it. The stitch match for each kind of seam keeps the rows even.
Why are there two kinds of half fan?
Each side edge needs a half fan with its straight edge facing out. The Right Half Fan fits the right side and the Left Half Fan, its mirror image, fits the left. One of each, turned upside down, fills a bottom corner.
Which way should the popcorns face?
Toward the right side. All popcorn rows are odd rows, which are RS rows, and each popcorn is closed from front to back so it pops toward you. The back of the fan stays flatter.
Can I crochet the fans together instead of sewing them?
You can, with a slip stitch seam through both loops, keeping the same stitch match: 25 stitches along each fan side. A crocheted seam stands up a little more on the back and uses more cream, so plan an extra skein of A.
Quick recap
- Make 35 [165, 240] fans and 7 [15, 16] half fans of each kind, every piece from a single stitch to 53 (or 28) stitches.
- Block every piece to size and let it dry.
- Lay out the afghan, then sew it row by row from the bottom, adding the half fans and the bottom pieces.
- Work 6 [2, 2] rows of single crochet along the straight side edges.
- Knot the short cream fringe along both scalloped ends of the twin and queen.
One small fan at a time, this crochet fan afghan turns into a whole sea of shaded arcs. If a row or a seam puzzles you along the way, ask through the Contact page.